As a freelanced modeler, there are certain liberties that I can take with my modeling efforts. One of those liberties that I choose to exploit is the non-existence of prototypical class I railroads in my world. In other words the UP, BNSF, NS and CSX never came to be in the universe that is known as MDRAIL. Instead, class I railroads in my world are represented by other freelanced railroad concepts.
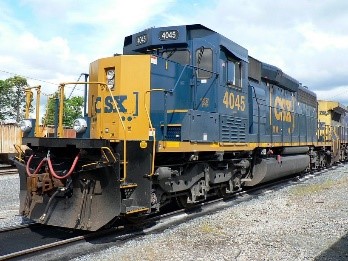
And while CSX is not a thing in my freelanced world, I absolutely love the CSX SD40-3 upgrades with the Wabtech (aka Sponge Bob) cabs; thus, they are a staple on the MDRAIL roster. My justification? MDRailShops, the maintenance and R&D component of MDRAIL, was tasked with extending the life of existing power in early 2011 by improving fuel efficiency, reliability and safety at a fraction of the cost of new equipment. MDRailShops collaborated with several partners (including Wabtech) to come up with the resulting SD40-3 rebuild.

So now that we have established the history and justification of this locomotive in the MDRAIL world, let’s talk about modeling. Yes, Scaletrains produces a very nice model of the SD40-3. As a matter of fact, I have one and will use it as the template for this kitbash. I am, however, a modeler on a budget; and, before Scaletrains introduced their model commercially, I had already begun to accumulate the supplies necessary to kitbash several SD40-2’s into the upgraded dash 3 version. I don’t have the resources to purchase any additional Scaletrains models, so kitbashing it is (besides, there’s something fun and therapeutic about putting sweat-equity into your models).
Over the next several weeks, this series will chronicle my efforts to build the “Sponge Bob” cab SD40-3. The base for this project will be an Athearn ready-to-Roll SD40-2 from their 2004 run (ATH79653).

This is very much a work in progress; and, while my goal is to produce a visually accurate and appealing model, I am still quite the novice when it comes to kitbashing and detailing. With that being said, let’s get on with the show!
Chassis Detail and Modifications
A good friend and fellow freelanced modeler introduced me to the TSG Multimedia YouTube channel as a good reference source for kitbashing and detailing. On this channel, they just so happen to have a series on building a specific SD40-2 model. Even though the model is not the “Sponge Bob” version that I am building, the general techniques still apply and are a key part to my own efforts. Therefore, following the example of the guys at TSG, I started my project with chassis modifications.
The Athearn ready-to-roll chassis on the model that I am modifying has the molded-on fuel tank fillers and gauges.  While I am not going for rivet-counter type details, Cannon and Company makes a great aftermarket fuel tank detail kit for EMD locomotives; therefore, the molded-on features get removed with my Dremel tool.
  Not only did I remove the fillers and gauges, I also removed the bracket details as well; because again, the Cannon and Company parts will make an excellent fill-in.
Studying my Scaletrains model; and, per the advice of the guys at TSG Multimedia, I determined that the fuel tank needed end plates. Using .010 styrene, I traced the outline of the fuel tank ends and cut out the plates for both sides. 
Once I affixed the end plates in place, I used a file to shape the styrene to the correct contour.
Next, using close-up photos of the prototype and my Scaletrains model, I determined the location for the gauges, fillers and other piping on the fuel tank. I marked them with a pencil and then proceeded to drill the appropriate sized holes so that I could add the details. Note here that I used an electric drill at a low setting in order to even make a dent (pun intended) in the metal. Once everything was drilled out, I carefully glued all of the detail parts (fuel filler, site glass, gauge, breather pipe and brackets) to the chassis. Once these parts were set, I added the traction motor cables above the fuel tank. I wasn’t too worried about accuracy here as the cables are more of a space-filler and won’t necessarily be visible.
For now, that’s it on the chassis. In the next installment, I will highlight preparations to the shell. Thanks for following along; and, I’ll see you next time!
